Huey Extensions
The huey.contrib package contains modules that provide extra functionality
beyond the core APIs.
Django
Huey comes with special integration for use with the Django framework. The integration provides:
Configuration of huey via the Django settings module.
Running the consumer as a Django management command.
Auto-discovery of
tasks.pymodules to simplify task importing.Properly manage database connections.
A backend for the
django.tasksframework (Django 6.0 and newer, or older Djangos using the django-tasks backport).Optional Admin integration for visibility and managing your Huey queue.
Supported Django versions are those officially supported at https://www.djangoproject.com/download/#supported-versions
Setting things up
To use huey with Django, the first step is to add an entry to your project’s
settings.INSTALLED_APPS:
# settings.py
# ...
INSTALLED_APPS = (
    # ...
    'huey.contrib.djhuey',  # Add this to the list.
    # ...
)
The above is the bare minimum needed to start using huey’s Django integration. If you like, though, you can also configure both Huey and the consumer using the settings module.
Huey settings are optional. If not provided, Huey will default to using Redis running on localhost:6379 (standard setup).
Configuration is kept in settings.HUEY, which can be either a dictionary or
a Huey instance. Here is an example that shows all of the supported
options with their default values:
# settings.py
HUEY = {
    'huey_class': 'huey.RedisHuey',  # Huey implementation to use.
    'name': settings.DATABASES['default']['NAME'],  # Use db name for huey.
    'results': True,  # Store return values of tasks.
    'store_none': False,  # If a task returns None, do not save to results.
    'immediate': settings.DEBUG,  # If DEBUG=True, run synchronously.
    'utc': True,  # Use UTC for all times internally.
    'blocking': True,  # Perform blocking pop rather than poll Redis.
    'connection': {
        'host': 'localhost',
        'port': 6379,
        'db': 0,
        'connection_pool': None,  # Definitely you should use pooling!
        # ... tons of other options, see redis-py for details.

        # huey-specific connection parameters.
        'read_timeout': 1,  # If not polling (blocking pop), use timeout.
        'url': None,  # Allow Redis config via a DSN.
    },
    'consumer': {
        'workers': 1,
        'worker_type': 'thread',
        'initial_delay': 0.1,  # Smallest polling interval, same as -d.
        'backoff': 1.15,  # Exponential backoff using this rate, -b.
        'max_delay': 10.0,  # Max possible polling interval, -m.
        'scheduler_interval': 1,  # Check schedule every second, -s.
        'periodic': True,  # Enable crontab feature.
        'check_worker_health': True,  # Enable worker health checks.
        'health_check_interval': 1,  # Check worker health every second.
    },
}
The following huey_class implementations are provided out-of-the-box:
huey.RedisHuey- default.huey.PriorityRedisHuey- uses Redis but adds support for Task priority. Requires redis server 5.0 or newer.huey.RedisExpireHuey- Redis implementation that expires result keys automatically if results are not read.huey.PriorityRedisExpireHuey- Redis implementation that expires result keys automatically if results are not read and supports priority.huey.SqliteHuey- uses Sqlite, full support for task priorities. Accepts afilenameparameter for the path to the database file.huey.PostgresHuey- uses Postgres, full support for task priorities. See Using Postgres for storage for connection and schema configuration.huey.FileHuey- uses filesystem for storage. Accepts apathparameter for the base storage directory.
Alternatively, you can simply set settings.HUEY to a Huey
instance and do your configuration directly. In the example below, I’ve also
shown how you can create a connection pool:
# settings.py: alternative configuration method
from huey import RedisHuey
from redis import ConnectionPool

pool = ConnectionPool(host='my.redis.host', port=6379, max_connections=20)
HUEY = RedisHuey('my-app', connection_pool=pool)
Using Postgres for storage
PostgresHuey lets you use your existing Postgres database as the
task queue, schedule and result store (pip install huey[postgres]). Two
integration points are worth calling out for Django users.
Schema creation
By default the storage backend issues create table if not exists for its
tables when it is instantiated. Because settings.HUEY is evaluated at import
time, that means every process importing huey.contrib.djhuey (including
your web workers) will connect and attempt to create the tables, which
requires the CREATE privilege and clashes with a migrations-managed schema.
Pass create_tables=False to disable the automatic DDL and create the tables
once, explicitly, using the create_huey_tables management command:
# settings.py
HUEY = {
    'huey_class': 'huey.PostgresHuey',
    'create_tables': False,
    'connection': {'dsn': 'postgresql:///my_db'},
}
./manage.py create_huey_tables
Reusing the Django database configuration
Rather than duplicating your credentials in settings.HUEY, you can point the
storage at the same database Django uses by passing a connection callable.
The callable must return a new, dedicated psycopg connection. Do not
hand back django.db.connection. Huey enables autocommit on the connection
and holds a long-lived one open for LISTEN, neither of which is compatible
with Django’s per-request connection or its transaction handling.
# settings.py
import psycopg
from django.conf import settings

def huey_connection():
    db = settings.DATABASES['default']
    return psycopg.connect(
        dbname=db['NAME'],
        user=db.get('USER') or None,
        password=db.get('PASSWORD') or None,
        host=db.get('HOST') or None,
        port=db.get('PORT') or None)

HUEY = {
    'huey_class': 'huey.PostgresHuey',
    'create_tables': False,
    'connection': {'connection': huey_connection},
}
To ensure a task is not enqueued until the surrounding transaction commits (for
example, when it references a row created in the same view), use
on_commit_task() as described in Enqueueing After Commit.
Running the Consumer
To run the consumer, use the run_huey management command. This command
will automatically import any modules in your INSTALLED_APPS named
tasks.py. The consumer can be configured using both the django settings
module and/or by specifying options from the command-line.
Options specified on the command line take precedence over those specified in the settings module.
To start the consumer, you simply run:
./manage.py run_huey
In addition to the HUEY.consumer setting dictionary, the management command
supports all the same options as the standalone consumer. These options are
listed and described in the Options for the consumer
section.
For quick reference, the most important command-line options are briefly listed here.
-w,--workersNumber of worker threads/processes/greenlets. Default is 1, but most applications should use at least 2.
-k,--worker-typeWorker type, must be “thread”, “process” or “greenlet”. The default is thread, which provides good all-around performance. For CPU-intensive workloads, process is likely to be more performant. The greenlet worker type is suited for IO-heavy workloads. When using greenlet you can specify tens or hundreds of workers since they are extremely lightweight compared to threads/processes. See note below on using gevent/greenlet.
-A,--disable-autoloadDisable automatic loading of tasks modules.
Due to a conflict with Django’s base option list, the “verbose” option is set
using -V or --huey-verbose. When enabled, huey logs at the DEBUG level.
For more information, read the Options for the consumer section.
Using gevent
When using worker type greenlet, it’s necessary to apply a monkey-patch
before any libraries or system modules are imported. Gevent monkey-patches
things like socket to provide non-blocking I/O, and if those modules are
loaded before the patch is applied, then the resulting code will execute
synchronously.
Unfortunately, because of Django’s design, the only way to reliably apply this
patch is to create a custom bootstrap script that mimics the functionality of
manage.py. Here is the patched manage.py code:
#!/usr/bin/env python
import os
import sys

# Apply monkey-patch if we are running the huey consumer.
if 'run_huey' in sys.argv:
    from gevent import monkey
    monkey.patch_all()

if __name__ == "__main__":
    os.environ.setdefault("DJANGO_SETTINGS_MODULE", "conf")
    from django.core.management import execute_from_command_line
    execute_from_command_line(sys.argv)
How to create tasks
The task() and periodic_task() decorators can be
imported from the huey.contrib.djhuey module. Here is how you might define
two tasks:
from huey import crontab
from huey.contrib.djhuey import periodic_task, task

@task()
def count_beans(number):
    print('-- counted %s beans --' % number)
    return 'Counted %s beans' % number

@periodic_task(crontab(minute='*/5'))
def every_five_mins():
    print('Every five minutes this will be printed by the consumer')
The huey.contrib.djhuey module exposes a number of additional helpers:
on_commit_task(), for enqueueing tasks after transaction commits.
Tasks that execute queries
If you plan on executing queries inside your task, it is a good idea to close
the connection once your task finishes. To make this easier, huey provides a
special decorator to use in place of task and periodic_task which will
automatically close the connection for you.
from huey import crontab
from huey.contrib.djhuey import db_periodic_task, db_task

@db_task()
def do_some_queries():
    # This task executes queries. Once the task finishes, the connection
    # will be closed.

@db_periodic_task(crontab(minute='*/5'))
def every_five_mins():
    # This is a periodic task that executes queries.
Enqueueing After Commit
The Huey Django extension provides a helper for when you need to ensure the active transaction has committed before enqueueing your task. Consider this example code:
@task()
def do_work(user_id):
    user = User.objects.get(pk=user_id)
    ...

@transaction.atomic
def some_view(request, ...):
    user = User.objects.create(...)
    do_work(user.id)
    return response
When some_view is executed, the do_work() task is enqueued with the ID
of the newly-created user row. If the task is enqueued and executed before
the transaction commits, then the task will report that the user matching that
ID does not exist (because it has not been committed yet).
To avoid this situation, we provide a special-purpose decorator
on_commit_task(), which registers a callback with Django that ensures
the task is enqueued after the transaction is committed. If no transaction
is active, the task will be enqueued normally.
Here is the safe version:
@on_commit_task()
def do_work(user_id):
    user = User.objects.get(pk=user_id)
    ...

@transaction.atomic
def some_view(request, ...):
    user = User.objects.create(...)
    do_work(user.id)  # Will not be enqueued until txn commits.
    return response
Because we have to setup a callback to run after commit, the full functionality
of the TaskWrapper is not available with tasks decorated with
on_commit_task(). If you anticipate needing all the TaskWrapper
methods, you can decorate the same function twice by given them two different
identifier names:
def do_work(user_id):
    user = User.objects.get(pk=user_id)
    ...

do_work_task = task(name="do_work_task")(do_work)
do_work_on_commit = on_commit_task(name="do_work_on_commit")(do_work)
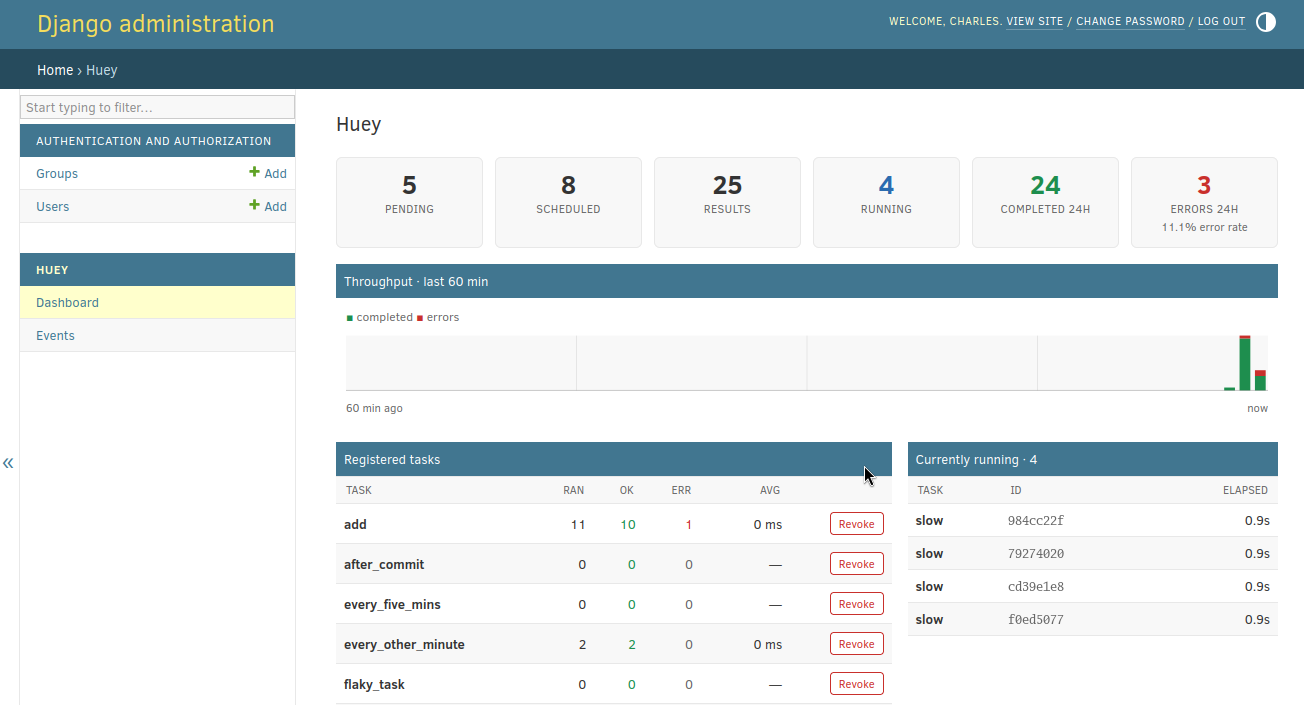
Admin dashboard
Huey can record task statistics (see Task statistics) and surface them in
the Django admin. Enable it by adding the stats app to INSTALLED_APPS:
INSTALLED_APPS = [
    # ...
    'huey.contrib.djhuey',
    'huey.contrib.djhuey.stats',
]
That is the whole setup. The app starts the stats recorder in every process
at start-up, including the consumer (run_huey is a management command),
so both enqueue and execution events are captured with no further
configuration. The recorder uses peewee for
storage, creating its tables automatically in DATABASES['default'] (there
are no migrations to run) and pruning old rows as new events are written.
The admin index gets a Huey section with two entries:
Dashboard: live queue depths, a throughput chart, per-task statistics, currently-running tasks and recent events, refreshed every 5 seconds, with controls to revoke/restore tasks and flush the queue, schedule, results or locks.
Events: a filterable, searchable log of the raw signal events.
Options may be provided via a HUEY_STATS setting:
HUEY_STATS = {
    'retention_hours': 48,   # Prune events older than this.
    'max_events': 2000,      # Cap on rows retained per queue.
    'capture_args': False,   # Store a truncated repr of task arguments.

    # Stats are stored in DATABASES['default'] by default. Override with
    # a peewee Database instance or db-url string:
    #'database': 'sqlite:///huey-stats.db',
}
Note
If HUEY_STATS['database'] points somewhere other than the default
Django database, the dashboard works as usual but the Events changelist
(which reads through the Django ORM) will not find the tables.
Note
The dashboard’s Registered tasks table lists the tasks known to the
web process. run_huey autodiscovers each app’s tasks module
but the web server does not, so import your tasks from your app’s
AppConfig.ready() to make them visible (see
examples/django_ex).
Django task framework
Django 6.0 includes django.tasks, a standard
interface for defining and enqueueing background tasks. Django does not ship
a production backend for actually running them - huey provides one. Tasks
declared with the django.tasks.task decorator are stored and executed by
the regular huey consumer, side-by-side with your native huey tasks. On older
Django versions, the backend works identically with the django-tasks backport package.
To use it, declare the backend in settings.TASKS. The backend uses the
shared huey instance configured by settings.HUEY, as described above:
# settings.py
TASKS = {
    'default': {
        'BACKEND': 'huey.contrib.djhuey.tasks_backend.HueyBackend',
    },
}
Tasks are declared and enqueued using the standard django.tasks APIs - no huey imports are necessary:
from django.tasks import task

@task
def send_welcome_email(user_id):
    ...

# In a view, etc:
result = send_welcome_email.enqueue(user.id)
result.id      # Unique identifier, usable with get_result().
result.status  # READY -> RUNNING -> SUCCESSFUL or FAILED.

# Later, check on it:
result.refresh()
if result.is_finished:
    print(result.return_value)
The consumer is run exactly as before - manage.py run_huey - and executes
django.tasks tasks and native huey tasks side-by-side.
Supported functionality:
run_afteris mapped onto huey’setaand handled by the scheduler.priorityis supported when the storage engine supports priorities, e.g.SqliteHueyorPriorityRedisHuey. With plainRedisHuey, declaring a task with a non-zero priority raisesInvalidTask.Results:
get_result(),refresh(), return values and errors (with tracebacks) are fully supported. Task status is tracked in the huey result store, soRedisExpireHueywill expire result data automatically.Database connections are closed after each task, equivalent to
db_task().Transactional enqueueing: add
'ENQUEUE_ON_COMMIT': Trueto the backend declaration to defer enqueueing until the active transaction commits (equivalent toon_commit_task()).Immediate mode applies as usual: when
DEBUG=True, tasks execute synchronously, through the same code-path the consumer uses.
Note
The django.tasks framework requires task functions to be defined at the
module level, and the huey backend additionally requires that they are
importable from their module path - lambdas cannot be enqueued.
Coroutine (async def) tasks are not supported.
DEBUG and Synchronous Execution
When settings.DEBUG = True, and settings.HUEY is a dict that does
not explicitly specify a value for immediate, tasks will be executed
synchronously just like regular function calls. The purpose of this is to
avoid running both Redis and an additional consumer process while developing or
running tests. If you prefer to use a live storage engine when DEBUG is
enabled, you can specify immediate_use_memory=False - which still runs Huey
in immediate mode, but using a live storage API. To completely disable
immediate mode when DEBUG is set, you can specify immediate=False in
your settings.
# settings.py
HUEY = {
    'name': 'my-app',

    # To run Huey in "immediate" mode with a live storage API, specify
    # immediate_use_memory=False.
    'immediate_use_memory': False,

    # OR:
    # To run Huey in "live" mode regardless of whether DEBUG is enabled,
    # specify immediate=False.
    'immediate': False,
}
Getting the Huey Instance
If you want to interact with Huey APIs that are not exposed through djhuey
explicitly, you can get the actual Huey instance in the following way:
from huey.contrib.djhuey import HUEY as huey

# E.g., get the underlying Storage instance.
storage = huey.storage
Configuration Examples
This section contains example HUEY configurations.
# Redis running locally with four worker threads.
HUEY = {
    'name': 'my-app',
    'consumer': {'workers': 4, 'worker_type': 'thread'},
}
# Redis on network host with 64 worker greenlets and connection pool
# supporting up to 100 connections.
from redis import ConnectionPool

pool = ConnectionPool(
    host='192.168.1.123',
    port=6379,
    max_connections=100)

HUEY = {
    'name': 'my-app',
    'connection': {'connection_pool': pool},
    'consumer': {'workers': 64, 'worker_type': 'greenlet'},
}
It is also possible to specify the connection using a Redis URL, making it easy to configure this setting using a single environment variable:
HUEY = {
    'name': 'my-app',
    'url': os.environ.get('REDIS_URL', 'redis://localhost:6379/?db=1')
}
Alternatively, you can just assign a Huey instance to the HUEY setting:
from huey import RedisHuey

HUEY = RedisHuey('my-app')
AsyncIO
While Huey does not provide first-class support for a full asyncio pipeline, in practice one of the most useful locations to be “async”-friendly is when blocking while waiting for a task result to be ready. When waiting for a task result, Huey must poll the storage backend to determine if the result is ready which means lots of opportunity for an asynchronous solution.
In order to simplify this, Huey provides two helpers for await-ing task
results. For a complete example of wiring Huey into an async web application,
see Using Huey with FastAPI.
- aget_result(result, backoff=1.15, max_delay=1.0, preserve=False)
- Parameters:
result (Result) – a result handle returned when calling a task.
- Returns:
task return value.
AsyncIO helper for awaiting the result of a task execution.
Example:
@huey.task()
def sleep(n):
    time.sleep(n)
    return n

async def main():
    # Single task, will finish in ~2 seconds (other coroutines can run
    # during this time!).
    rh = sleep(2)
    result = await aget_result(rh)

    # Awaiting multiple results. This will also finish in ~2 seconds.
    r1 = sleep(2)
    r2 = sleep(2)
    r3 = sleep(2)
    results = await asyncio.gather(
        aget_result(r1),
        aget_result(r2),
        aget_result(r3))
- aget_result_group(rg, *args, **kwargs)
- Parameters:
rg (ResultGroup) – a result-group handle for multiple tasks.
- Returns:
return values for all tasks in the result group.
AsyncIO helper for awaiting the result of multiple task executions.
Example:
@huey.task()
def sleep(n):
    time.sleep(n)
    return n

async def main():
    # Spawn 3 "sleep" tasks, each sleeping for 2 seconds.
    rg = sleep.map([2, 2, 2])

    # Await the results. This will finish in ~2 seconds while also
    # allowing other coroutines to run.
    results = await aget_result_group(rg)
Task statistics
enable_stats() attaches a lightweight recorder to a Huey
instance that persists task signals (enqueued, executing, complete, error,
retrying, and so on) into a pair of peewee
tables. From those tables you can compute throughput, error-rates, per-task
timing and a live view of what is currently running.
The recorder depends only on peewee and writes to any peewee Database you
give it (SQLite, Postgres, MySQL). It is the engine behind the
Flask-Peewee admin panel and the
Django admin dashboard, but it stands on its own:
use it to feed a custom dashboard, a metrics exporter or a CLI report.
Enabling
Signals fire in the process where a task runs, so to record task execution
the recorder must be enabled in the consumer. Call enable_stats()
once, in a module the consumer imports:
import peewee

from huey import SqliteHuey
from huey.contrib.stats import enable_stats

huey = SqliteHuey('/path/to/tasks.db')

# Any peewee (or flask-peewee) Database. It need not be the huey storage,
# and a networked database (Postgres/MySQL) lets a separate web process
# read the same statistics.
stats_db = peewee.SqliteDatabase('/path/to/stats.db')

stats = enable_stats(huey, stats_db)
enable_stats() is idempotent per huey instance and returns a
HueyStats object. Enabling it in additional processes (for example
a web app that enqueues tasks) is harmless and captures the signals that occur
there. Statistics are scoped by huey.name, so several huey instances may
share one database without their data mixing.
Querying
The HueyStats object returned by enable_stats() (also
available afterwards as huey._stats) exposes read helpers:
stats = enable_stats(huey, stats_db)

stats.window_counts()          # {'complete': 1200, 'error': 3, ...} last 24h
stats.task_breakdown()         # per-task executed/completed/errors/avg
stats.throughput(minutes=60)   # {'complete': [...], 'error': [...]} per minute
stats.recent_events(limit=50)  # most recent events, newest first
stats.inflight()               # tasks currently executing
Two tables are created when the recorder starts (unless create_tables=False):
huey_event, an append-only event log trimmed to the retention settings, and
huey_inflight, one row per currently-executing task. Writes are buffered and
flushed by a background thread, so recording adds negligible overhead to task
execution.
API
- enable_stats(huey, db[, **options])
Attach a stats recorder to
hueyand begin writing task events todb. Idempotent per huey instance. Returns aHueyStats.- Parameters:
huey – the
Hueyinstance to monitor.db – a peewee
Databaseor flask-peeweeDatabasein which thehuey_eventandhuey_inflighttables live.retention_hours (int) – how long to keep events, in hours (default 48).
max_events (int) – maximum events retained per queue (default 2000).
capture_args (bool) – also store a truncated repr of each task’s args and kwargs (default False).
create_tables (bool) – create the tables if they do not exist (default True).
- class HueyStats
Returned by
enable_stats(). Query helpers:- window_counts(seconds=86400)
Return
{signal: count}over the lastseconds.
- task_breakdown()
Return a list of per-task dicts with
executed,completed,errors,retriesand averageavgduration.
- throughput(minutes=60)
Return
{'complete': [...], 'error': [...]}, one bucket per minute, oldest first.
- recent_events(limit=50)
Return the most recent events, newest first.
- inflight()
Return the tasks that are currently executing.
Flask-Peewee admin
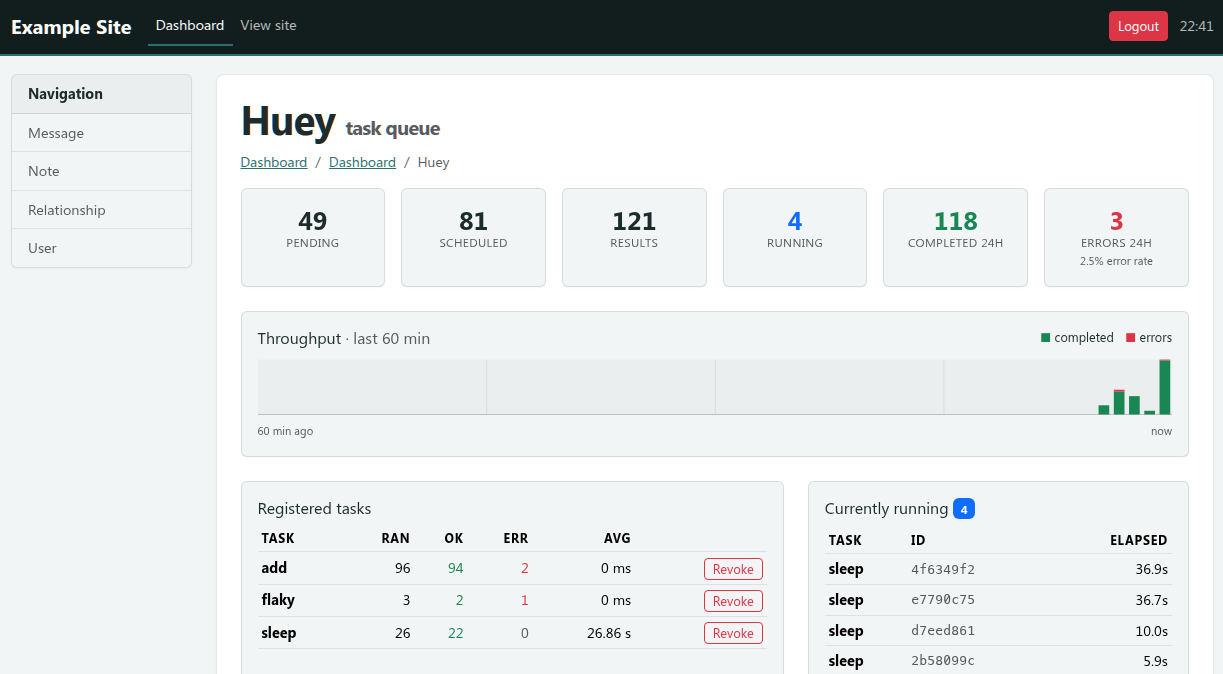
HueyPanel adds a huey monitoring dashboard to the admin site
provided by flask-peewee. The
dashboard shows live queue depths, currently-running tasks, recent events,
per-task throughput and error-rates, and provides controls for revoking or
restoring tasks and flushing the queue, schedule, results or locks.
The panel is a front-end for the task statistics engine, so its data comes from two places:
enable_stats()runs in the consumer and records task signals (executing, complete, error, …) into the stats database. See Task statistics for details.HueyPanelruns in your web application and renders that recorded history alongside live queue introspection.
Both point at the same database, so it must be reachable by both processes.
Registering the panel
Register the panel with your flask-peewee Admin instance, passing
the huey instance as an extra argument:
from huey.contrib.flask_admin import HueyPanel

admin.register_panel('Huey', HueyPanel, huey)
By default the panel stores and reads statistics in your admin’s authentication
database (admin.auth.db). To keep them elsewhere, pass a database
explicitly:
admin.register_panel('Huey', HueyPanel, huey, stats_db)
Registering the panel also calls enable_stats(),
so the stats tables are created when the admin site starts up and the web
process records any signals it sees (such as tasks enqueued from a request).
To capture task execution, which feeds the throughput, per-task and event views, enable the recorder in the consumer as well (Task statistics). Without it, the panel still shows the live queue counts (pending, scheduled, results), but the history tables remain empty.
- class HueyPanel
A flask-peewee
AdminPanelsubclass. Register it withAdmin.register_panel(), passing the huey instance and, optionally, the stats database:admin.register_panel('Huey', HueyPanel, huey) # db = admin.auth.db admin.register_panel('Huey', HueyPanel, huey, stats_db)
Mini-Huey
MiniHuey provides a very lightweight huey-like API that may be
useful for certain applications. The MiniHuey consumer runs inside a
greenlet in your main application process. This means there is no separate
consumer process to manage, nor is there any persistence for the
enqueued/scheduled tasks; whenever a task is enqueued or is scheduled to run, a
new greenlet is spawned to execute the task.
MiniHuey may be useful if:
Your application is a WSGI application.
Your tasks do stuff like check for spam, send email, make requests to web-based APIs, query a database server.
You do not need automatic retries, persistence for your message queue, dynamic task revocation.
You wish to keep things nice and simple and don’t want the overhead of additional process(es) to manage.
MiniHuey may be a bad choice if:
Your application is incompatible with gevent (e.g. uses asyncio).
Your tasks do stuff like process large files, crunch numbers, parse large XML or JSON documents, or other CPU or disk-intensive work.
You need a persistent store for messages and results, so the consumer can be restarted without losing any unprocessed messages.
If you are not sure, then you should probably not use MiniHuey. Use the
regular Huey instead.
Usage and task declaration:
- class MiniHuey([name='huey'[, interval=1[, pool_size=None]]])
- Parameters:
name (str) – Name given to this huey instance.
interval (int) – How frequently to check for scheduled tasks (seconds).
pool_size (int) – Limit number of concurrent tasks to given size.
- task([validate_func=None])
Task decorator similar to
Huey.task()orHuey.periodic_task(). For tasks that should be scheduled automatically at regular intervals, simply provide a suitablecrontab()definition.The decorated task will gain a
schedule()method which can be used like theTaskWrapper.schedule()method.Examples task declarations:
from huey import crontab
from huey.contrib.mini import MiniHuey

huey = MiniHuey()

@huey.task()
def fetch_url(url):
    return urlopen(url).read()

@huey.task(crontab(minute='0', hour='4'))
def run_backup():
    pass

@huey.periodic_task(crontab(hour='10,14', minute='30'))
def send_reminders():
    pass
Example usage. Running tasks and getting results work about the same as regular Huey:
# Executes the task asynchronously in a new greenlet.
result = fetch_url('https://google.com/')

# Wait for the task to finish.
html = result.get()
Scheduling a task for execution:
# Fetch in ~30s.
result = fetch_url.schedule(('https://google.com',), delay=30)

# Wait until result is ready, takes ~30s.
html = result.get()
- start()
Start the scheduler in a new green thread. The scheduler is needed if you plan to schedule tasks for execution using the
schedule()method, or if you want to run periodic tasks.Typically this method should be called when your application starts up. For example, a WSGI application might do something like:
# Always apply gevent monkey-patch before anything else!
from gevent import monkey; monkey.patch_all()

from my_app import app  # flask/bottle/whatever WSGI app.
from my_app import mini_huey

# Start the scheduler. Returns immediately.
mini_huey.start()

# Run the WSGI server.
from gevent.pywsgi import WSGIServer
WSGIServer(('127.0.0.1', 8000), app).serve_forever()
- stop()
Stop the scheduler.
Tasks enqueued for immediate execution will be run regardless of whether the scheduler is running. You only need to start the scheduler if you plan to schedule tasks in the future or run periodic tasks.